 This is the second post in a series on how to train a horse. I am writing for the novice horseman in mind, so if some of this is redundant to your level of experience, please understand that there are beginners that may need to know every detail of the training process. This advice is not meant to be a beginner’s only resource—I always suggest that a person find a mentor in the horse training business, and watch from a safe distance before they ever try starting a colt themselves.
The first part covered the saddling process, and the next thing you want to do before that first ride is to be sure you’ve got a handle on the horse’s face. I admit, I have climbed on colts bareback with no headgear for their “first ride”. But I think I was lucky to not get into trouble with that. I have also ridden colts in a round pen with no headgear, while another trainer worked the colt from horseback, directing and turning the colt in the round pen. But if it’s just you working with the colt, my suggestion is to introduce the bit and work on him bending his head a little before you ride.
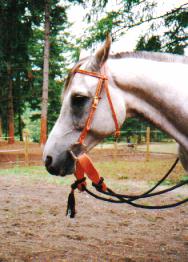
When training horses, you can choose from a variety of headgear to start out with, but it’s best to pick one and stick with it throughout the first sixty rides or so. You might like using a simple rope halter and lead. A bosal or hackamore is also a great choice, as the simplicity of direct pressure on the colt’s nose rather than the strange feel of a bit in a colt’s mouth is much easier for the colt to be happy with. I usually start out using a plain o-ring snaffle bit.
Right after the introduction of the saddle, I put a bridle fitted with just a snaffle bit, no reins, on the colt and let him wear it while I work on other things with him. Colts will usually “mouth” the bit, or chew on it, for the first several rides. They are just getting used to it, and will try to get it out of their mouths by pushing with their tongues. Watch to see that the colt doesn’t have his tongue over the bit, that can happen easily, and you will need to stop and fix it. Adjust the headstall so that it fits pretty tightly, because a colt doesn’t know how to “carry” a bit yet, and if it hangs low in his mouth he is really not going to like that fit. The horse’s mouth should have a wrinkle or two at the corners of his lips, if the headstall is adjusted right. If it’s so tight you can’t slip it over his ears easily, then it needs loosened. But if the bit isn’t fitting snugly in the corners of his lips, then it needs tightened. Give the colt plenty of time to get used to the feel of the bit before you start working on reining at all.
The next step is to ask for a lateral bend. I like to tie up one rein and get the colt to bend and give to the direct rein pressure. This helps a colt learn to find relief by turning his head, bending his neck, and giving to the pressure. Leave the other rein completely loose. You can remove it from the bridle or tie it up to the cinch ring, tight enough that he can’t get a leg over it, but loose enough that it does not have any contact on his mouth at all, even when his head is turned to the opposite side. Take the other rein and tie it either to the stirrup or the cinch ring. I like to tie to the stirrup best, because it has a little “give” to it and will help the colt find relief from the pull. You want to tie this rein short enough so that there is a steady pull on the colt’s mouth if his head is positioned directly in front of him, but loose enough to find slack and relief if he turns his head towards that side and “gives” to the pressure.
I usually tie up one side for half an hour, and just leave the colt to wander in circles in the round pen. Then I come back, untie him and pet him, and switch sides and let him turn the other direction for half an hour. Keep within eyesight while his head is tied around, so that if he gets a leg over his rein or the other rein comes loose and is dragging, he won’t get into a fracas and hurt his mouth badly. Do this exercise on consecutive days until the colt learns to stand still and only turn his head to the side and keep it there, finding rest and relief from the rein pressure. Then you know he has learned to “give” and is ready to start riding.

